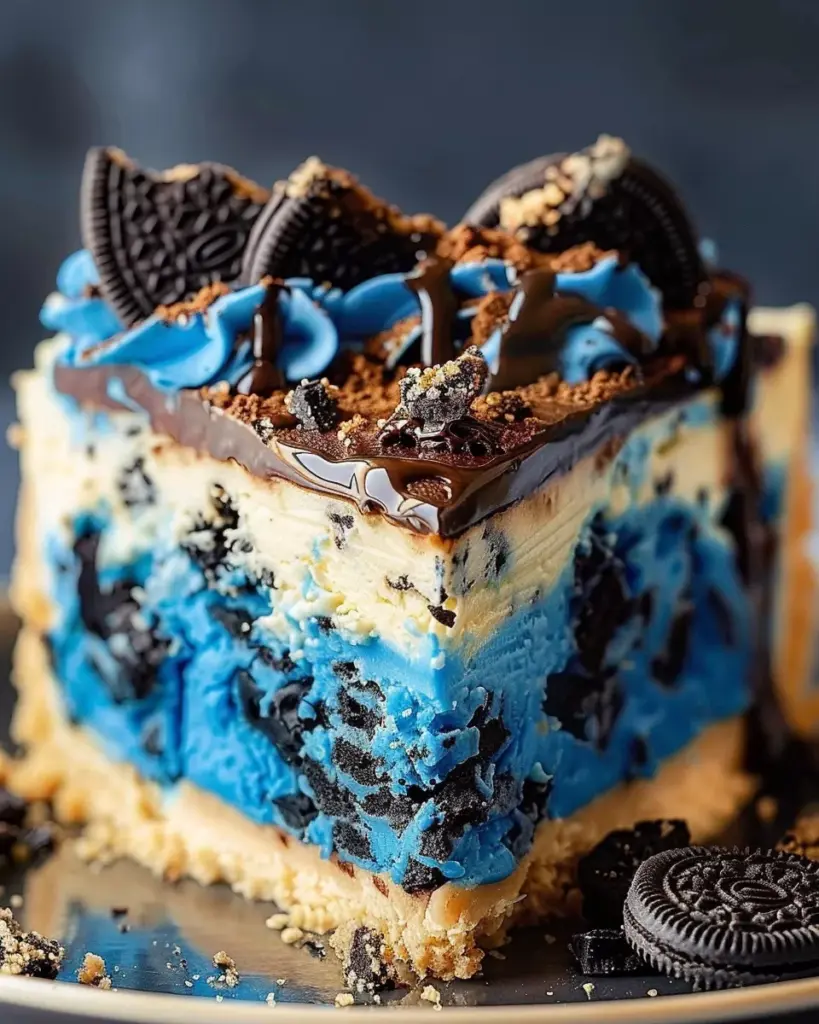
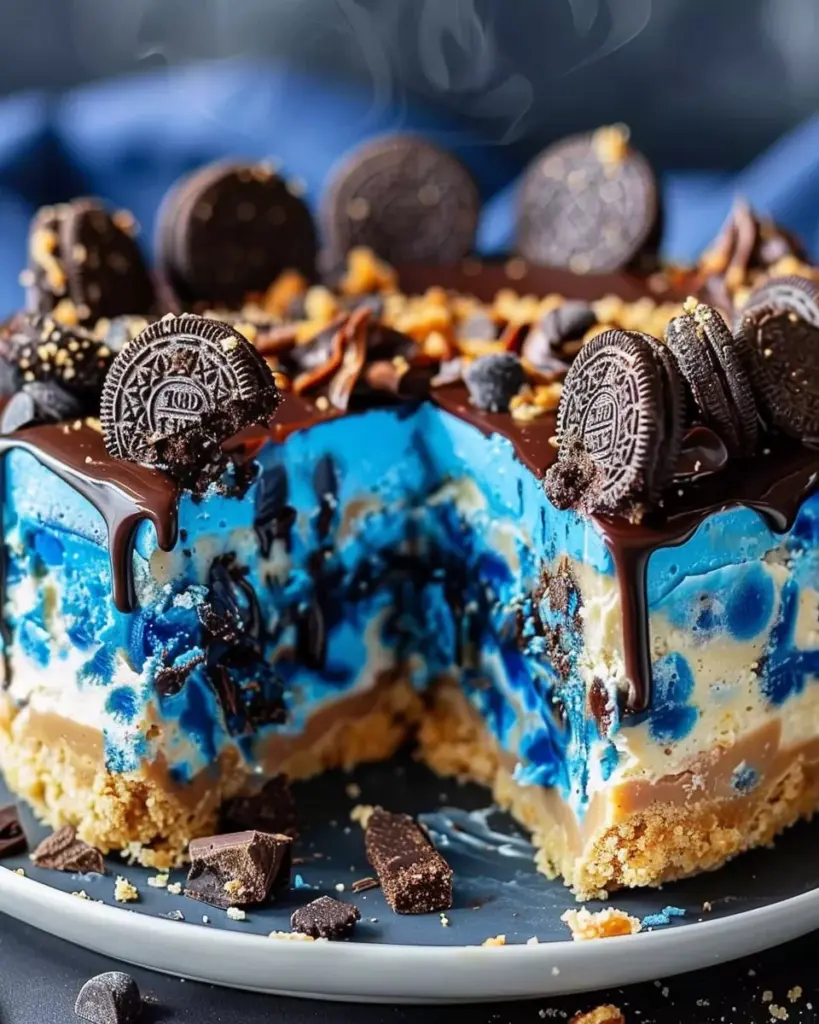
Cookie Monster Cheesecake
The Cookie Monster Delight is no ordinary dessert. It’s a stunning fusion of chocolate chip blondie, cookies and cream cheesecake, and a rich chocolate ganache topping—all dyed in that unmistakable Cookie Monster blue. This cheesecake isn’t just about flavor; it’s a full sensory experience. With its vibrant color and layered textures, it delivers a delightful contrast of chewy, creamy, and crunchy in every bite.

Perfect for birthdays, themed parties, or any gathering where you want a show-stopping dessert, this cheesecake will win hearts at first glance and first bite. Whether you’re baking for kids or impressing dessert lovers, this recipe hits all the right notes.
Why will you love this recipe?
- It’s playful, bold, and delicious.
- Combines a chewy blondie base with rich, creamy cheesecake.
- Bright blue color makes it a visual hit.
- Oreo cookies and chocolate chips bring familiar, comforting flavors.
- Customizable for different events or dietary preferences.
Let’s dive into the preparation phase.
Preparation Phase & Tools to Use
Essential Tools and Equipment
To make this recipe smoothly, gather the following kitchen tools:
- Springform pan (8-inch preferred): For easy cheesecake release and layered structure.
- Large baking dish or roasting pan: For creating a water bath during baking.
- Electric mixer (hand or stand): Ensures a smooth cheesecake batter without lumps.
- Mixing bowls (various sizes): You’ll need separate bowls for the blondie, cheesecake, and ganache layers.
- Measuring cups and spoons: Precise measurements are crucial for baking success.
- Rubber spatula and whisk: For gentle folding and scraping the bowl clean.
- Microwave-safe bowl or small saucepan: To melt butter and later prepare ganache.
- Parchment paper and non-stick spray or butter: To line and grease the pan effectively.
- Cooling rack and refrigerator space: The cheesecake needs to cool fully before serving.
- Sharp knife and offset spatula (optional): For clean slices and ganache spreading.
Importance of Each Tool
- Springform pan: Essential for layered cheesecakes. Allows easy removal without damaging the structure.
- Water bath setup: Helps prevent cracking and ensures even baking throughout the cheesecake.
- Electric mixer: Vital for creating a lump-free batter and incorporating ingredients evenly.
- Spatulas and whisks: Reduce overmixing and help maintain the cheesecake’s airy texture.
- Accurate measurements: Prevent texture issues. Baking is more science than art.
Preparation Tips
- Bring all ingredients to room temperature before mixing, especially cream cheese and eggs.
- Line the base of your springform pan with parchment for easy removal.
- Grease both the sides and base well.
- Crush cookies in advance to avoid delays once the batter is ready.
- Preheat oven and boil water for the bath ahead of time.
Ingredients
Here’s a clear breakdown of ingredients by layer:
For the Blondie Base
- ½ cup unsalted butter
- ½ teaspoon salt
- ⅓ cup brown sugar
- 1 egg
- 1 teaspoon vanilla extract
- ½ cup all-purpose flour
- ½ cup semisweet mini chocolate chips
For the Cheesecake Layer
- 16 oz cream cheese (two 8 oz blocks)
- 2 teaspoons cornstarch
- ⅓ cup granulated sugar
- Pinch of salt
- ½ cup whipping cream
- Blue gel food coloring (amount to desired hue)
- 1 teaspoon vanilla extract
- 3 eggs
- 15 regular Oreo cookies, crushed
For the Ganache Topping
- ¾ cup semisweet chocolate chips
- ½ cup heavy whipping cream
- Pinch of salt
Optional Decorations
- Crushed cookies
- Blue candy melts
- Whipped cream or sprinkles
Step-by-Step Directions
1. Bake the Blondie Base
- Preheat the oven to 350°F (175°C).
- Melt the butter in a saucepan over medium heat or in a microwave-safe bowl.
- Stir in the salt and brown sugar until fully combined.
- Remove from heat. Mix in the egg and vanilla extract until smooth.
- Add the flour and stir until just combined. Do not overmix.
- Fold in the mini chocolate chips.
- Pour the batter into a greased and lined springform pan.
- Spread evenly and bake for 15–20 minutes. A toothpick should come out clean.
- Allow to cool completely on a wire rack.
2. Prepare the Cheesecake Layer
- Beat the cream cheese in a large bowl until smooth and creamy.
- Add the cornstarch, sugar, and pinch of salt. Mix until well incorporated.
- Pour in the whipping cream, blue gel food coloring, and vanilla extract. Blend thoroughly.
- Beat in the eggs one at a time. Mix just until combined after each addition.
- Gently fold in the crushed Oreo cookies using a spatula.
- Pour the cheesecake mixture over the cooled blondie base.
- Tap the pan gently on the counter to release air bubbles.
3. Bake the Cheesecake
- Wrap the outside of the springform pan in foil to prevent leaks.
- Place the pan inside a larger baking dish.
- Fill the outer pan with hot water until it reaches halfway up the sides of the springform.
- Bake at 300°F (150°C) for 45–55 minutes.
- The edges should be set; the center should slightly jiggle.
- Turn off the oven. Let the cheesecake cool inside for 1 hour with the door slightly open.
- Remove and refrigerate overnight.
4. Make the Ganache
- Combine chocolate chips, heavy cream, and a pinch of salt in a microwave-safe bowl.
- Heat in 30-second intervals, stirring between each, until fully melted and smooth.
- Let the ganache cool slightly before pouring.
5. Assemble and Decorate
- Pour ganache over the chilled cheesecake.
- Spread evenly using an offset spatula.
- Decorate with additional crushed cookies or toppings of your choice.
- Chill for 15 minutes to set the ganache before slicing.
Serving Suggestions
This cheesecake isn’t just about flavor—it’s an experience. Serve it chilled and slice it clean for the best presentation. Because of its rich layers, this dessert is best served in small slices.
When to Serve It
- At themed birthday parties
- As a show-stopping holiday dessert
- For cookie or chocolate lovers
- At kids’ events or bake sales
- During family celebrations
How to Present It
- Use a sharp, warm knife for neat slices. Wipe the blade between cuts.
- Add a small dollop of whipped cream on each slice.
- Garnish the plate with cookie crumbs or a sprinkle of cocoa powder.
- Serve on white or neutral plates to let the color pop.
- Cut thin slices; it’s rich, so smaller portions go a long way.
Pairing Ideas
- Cold milk is a classic and refreshing match.
- A smooth cup of coffee or latte balances the sweetness.
- Serve with berry lemonade or sparkling water for kids.
- For adults, try a dark chocolate liqueur or a nutty dessert wine.
Bonus Tip
If you’re making it for a crowd, turn it into bars. Use a square pan and cut into bite-sized pieces for easier serving.
Common Mistakes To Avoid & How to Perfect the Recipe
Avoiding key mistakes will ensure a cheesecake that not only looks perfect but also tastes incredible.
Mistake 1: Overbaking the Blondie Base
What happens: It becomes too dry and crumbly.
Fix: Remove it from the oven as soon as a toothpick comes out with moist crumbs—not dry. Let it cool fully before adding the cheesecake layer.
Mistake 2: Lumpy Cheesecake Batter
What happens: A rough, grainy texture.
Fix: Ensure cream cheese is at room temperature before mixing. Beat until smooth before adding sugar and eggs.
Mistake 3: Cracks in the Cheesecake
What happens: The surface cracks or splits.
Fix: Use a water bath. Don’t overbake. Let the cheesecake cool slowly in the oven before chilling.
Mistake 4: Uneven Color
What happens: Streaks of blue or grey patches.
Fix: Use gel food coloring and mix thoroughly. Avoid using too much; a small amount gives a bold hue.
Mistake 5: Ganache Too Runny
What happens: Ganache seeps into the cheesecake or overflows.
Fix: Allow ganache to cool slightly before pouring. Use equal parts cream and chocolate for a thicker finish.
Mistake 6: Slicing Messily
What happens: The slice tears or layers collapse.
Fix: Chill thoroughly. Use a hot knife, cleaned between each slice.
Mistake 7: Rushing the Chill Time
What happens: The cheesecake doesn’t set properly.
Fix: Chill overnight in the fridge—minimum 6 hours for clean slicing and full flavor.
Mistake 8: Skipping the Water Bath
What happens: The texture becomes dry or uneven.
Fix: Always bake in a water bath. It distributes heat evenly and protects the delicate cheesecake layer.
Side Dish Recommendations
Pairing your Cookie Monster Delight with the right side dish can enhance the experience. Here are eight perfect complements.
Fresh Berry Medley
A light mix of strawberries, blueberries, and raspberries brings freshness. Their tartness cuts through the richness of the cheesecake.
Vanilla Bean Ice Cream
Creamy vanilla ice cream melts next to the chilled cheesecake, creating a contrast in temperature and texture.
Chocolate Sauce with Sea Salt
Drizzle a warm chocolate sauce over the slice and sprinkle lightly with sea salt. It enhances the chocolate notes and adds sophistication.
Whipped Cream and Cookie Crumbs
Add a swirl of fresh whipped cream and top with crushed cookies. This adds airiness and a light crunch.
Espresso or Coffee Affogato
For adult gatherings, serve a small scoop of vanilla ice cream with a shot of espresso alongside the cheesecake.
Citrus Sorbet
Lemon or lime sorbet refreshes the palate and balances the sweetness. It’s a great finish for a rich dessert.
Mint Leaves and Chocolate Shavings
Add a few mint leaves and dark chocolate curls. This garnish brings elegance and a subtle refreshing touch.
Caramelized Banana Slices
Slice bananas, sauté with butter and brown sugar until golden, then serve warm on the side for a tropical twist.
Recipe Tips for Success
- Use full-fat cream cheese for the creamiest, most flavorful result.
- Don’t overmix the cheesecake batter after adding eggs. Overmixing introduces air bubbles that can cause cracking.
- Use blue gel food coloring instead of liquid. It’s more concentrated and won’t affect batter consistency.
- Reserve some crushed cookies to sprinkle on top for added crunch and visual appeal.
- Let each layer cool properly before adding the next to avoid sinking or bleeding of layers.
Storage Instructions
- Refrigeration: Store the cheesecake covered in the fridge for up to 4 days. Use plastic wrap or an airtight container.
- Freezing: Wrap individual slices in plastic wrap, then foil. Freeze for up to 1 month. Thaw overnight in the refrigerator before serving.
- Avoid storing at room temperature for long periods, especially if the environment is warm.
Reheating and Serving from Storage
- No need to reheat. This cheesecake is meant to be served chilled or slightly softened.
- To serve from fridge: Let it sit at room temperature for 10–15 minutes before slicing.
- From freezer: Unwrap and thaw in the fridge for 6–8 hours. Avoid using the microwave as it may affect texture.
Knife Slicing Tip
Run a sharp knife under hot water. Wipe it dry before slicing. Repeat for each cut to maintain clean layers.
Frequently Asked Questions (FAQs)
Can I use regular chocolate chips instead of mini chips?
Yes. Regular chips work well, but mini chips distribute more evenly in the blondie base.
Do I have to use blue food coloring?
No. You can skip it for a classic cookies and cream look. For a natural option, use butterfly pea powder or spirulina.
Why did my cheesecake crack?
Cracks are usually due to overbaking, skipping the water bath, or sudden temperature changes. Bake gently and cool gradually.
Can I make this in a 9-inch pan?
Yes, but the layers will be thinner. Reduce baking time slightly and monitor doneness by the jiggle test.
What’s the best way to slice a layered cheesecake?
Use a hot, clean knife. Wipe the blade after each cut. Chill the cheesecake well before slicing.
Can I skip the water bath?
It’s not recommended. Without it, the cheesecake may bake unevenly or develop cracks. Use a well-sealed foil wrap if concerned about leaks.
Is it possible to make this recipe gluten-free?
Yes. Use a gluten-free flour blend for the blondie base and certified gluten-free cookies.
Can I make this dessert ahead?
Absolutely. It tastes better the next day. Make it up to 2 days in advance and store it in the refrigerator.