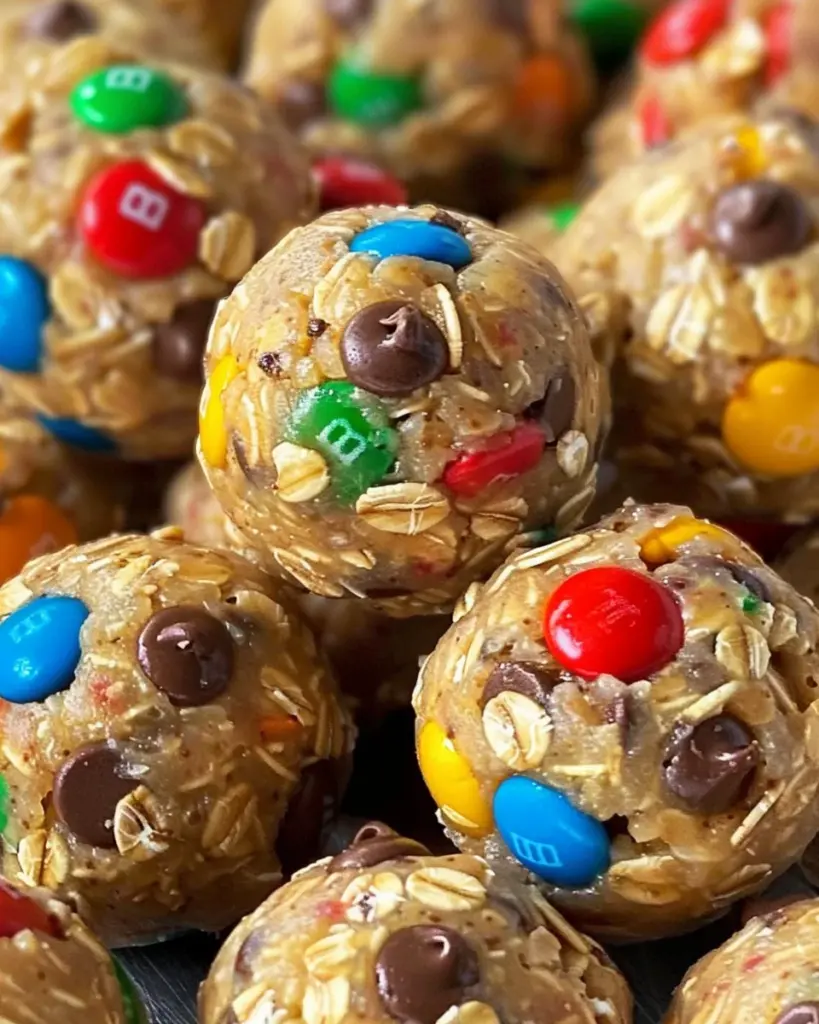
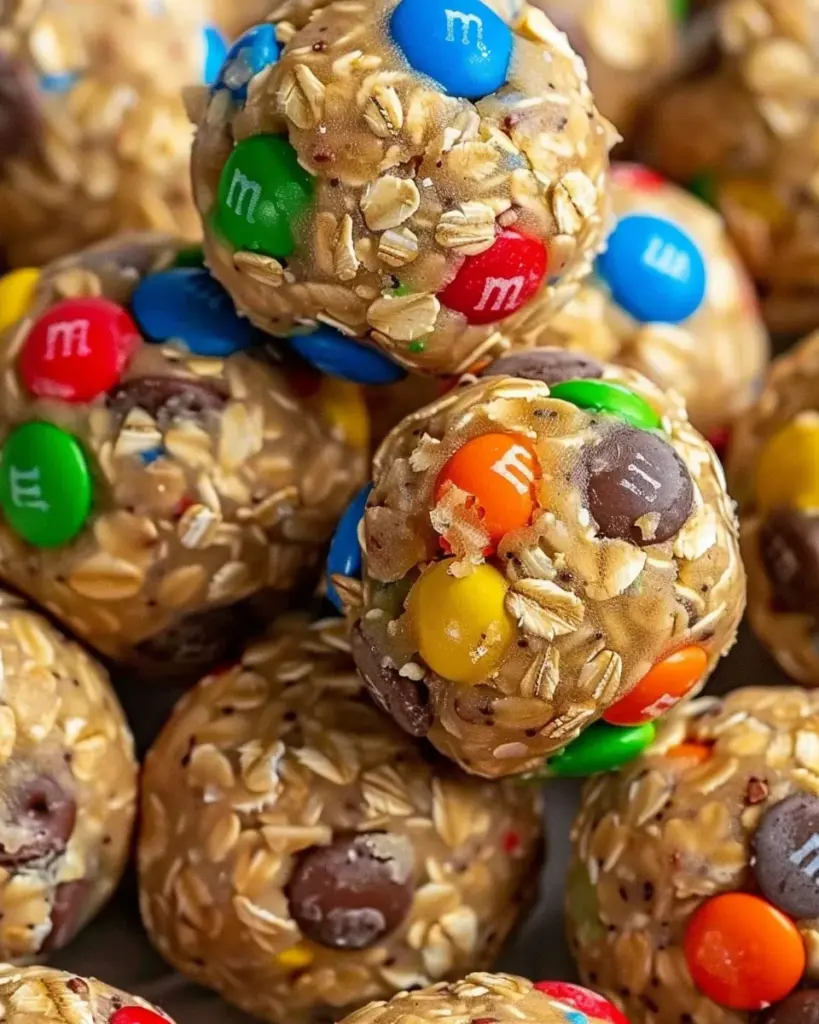
Monster Cookie Energy Balls
If you’re looking for a snack that’s equal parts fun, flavorful, and functional, these monster cookie energy balls are the answer. Chewy, colorful, and packed with wholesome ingredients, they’re a healthier twist on a classic cookie favorite.
These no-bake bites deliver everything you love about monster cookies—like peanut butter, oats, and mini M&Ms—but in a portable, protein-rich snack format. Ideal for busy mornings, after-school treats, or pre-workout energy boosts, they’re quick to make, easy to store, and endlessly customizable.
Why You’ll Love Monster Cookie Energy Balls
- Dessert-style taste with healthier ingredients
- No oven needed—ready in under an hour
- Packed with fiber, healthy fats, and protein
- Loved by kids and adults alike
- Great for meal prep and snack planning
- Easily adaptable to dietary needs
Whether you want a guilt-free sweet fix, a post-gym pick-me-up, or something to brighten a lunchbox, these monster cookie energy balls fit the bill.
Preparation Phase & Tools to Use
Making monster cookie energy balls is quick and mess-free if you’re properly prepared. Here’s how to get started.
Essential Tools and Equipment
To ensure smooth preparation, gather the following:
- Mixing bowl: A large bowl to combine all ingredients
- Spatula or wooden spoon: For mixing without sticking
- Measuring cups and spoons: For accuracy
- Parchment paper: Prevents sticking when rolling and storing
- Cookie scoop or tablespoon: For uniform size and portioning
- Airtight storage container: For refrigeration or freezing
- Optional: Food processor, if you prefer a finer oat texture
Each tool plays a role in reducing prep time and ensuring consistent, professional-looking results.
Importance of Each Tool
- Mixing bowl: Needs to be large enough to hold all ingredients
- Spatula: Flexible for folding in candy pieces without breaking them
- Parchment paper: Essential for preventing candy from sticking to surfaces
- Cookie scoop: Makes equal-sized balls for even nutrition and appearance
Preparation Tips
- Soften your peanut butter: If too thick, microwave for 15 seconds before mixing.
- Use clean hands or gloves when rolling to avoid stickiness.
- Chill before rolling: This firms the mixture and makes shaping easier.
- Work quickly: The mixture becomes sticky as it warms up.
- Use mini-sized mix-ins: Mini chocolate chips and M&Ms blend better and hold the shape.
Ingredients List
What You’ll Need
Organize your ingredients for easier assembly. Here’s the complete list:
- 1½ cups old-fashioned rolled oats
- ½ cup creamy peanut butter (or almond butter)
- ⅓ cup honey or pure maple syrup
- ½ teaspoon vanilla extract
- ¼ teaspoon salt
- ¼ cup ground flaxseed (optional, for added fiber)
- ½ cup mini M&Ms
- ¼ cup mini chocolate chips
- 2 tablespoons chia seeds (optional, for crunch and omega-3s)
Ingredient Notes
- Peanut butter: Smooth, not natural-style, binds better
- Maple syrup: For a vegan version, though slightly less sticky than honey
- Oats: Use old-fashioned for chew and texture—quick oats may crumble
- Flaxseed & chia seeds: Boost nutrition and improve binding
Step-by-Step Directions
Step 1: Mix the Wet Ingredients
In a large bowl, stir together:
- Peanut butter
- Honey (or maple syrup)
- Vanilla extract
- Salt
Mix until smooth and creamy. This forms the base that binds everything together.
Tip: If peanut butter is firm, warm it slightly in the microwave for easier mixing.
Step 2: Add the Dry Ingredients
Stir in:
- Rolled oats
- Ground flaxseed (optional)
- Chia seeds (optional)
Mix until everything is well coated. The result should be thick and slightly sticky.
Pro Tip: If the mixture feels too dry, add 1–2 teaspoons of warm water or a bit more peanut butter.
Step 3: Fold in the Fun
Gently fold in:
- Mini M&Ms
- Mini chocolate chips
These add color, crunch, and sweetness—mimicking monster cookies without the oven.
Step 4: Chill the Mixture
Cover the bowl and place it in the refrigerator for at least 30 minutes. This step makes the dough easier to handle and roll.
Step 5: Roll into Balls
Once chilled, scoop about 1 tablespoon of dough and roll it between your palms into a ball.
- Place on a parchment-lined tray or plate.
- Yield: Approximately 18–20 energy balls
Tip: Lightly dampen hands if the mixture sticks.
Step 6: Store and Enjoy
Transfer the balls into an airtight container.
- Fridge: Store up to 7 days
- Freezer: Store up to 3 months
Serving Tip: Let frozen balls thaw for 5 minutes before eating.
Serving Suggestions
Once your monster cookie energy balls are prepped and chilled, it’s time to enjoy them in all sorts of ways. These snack bites are incredibly versatile, making them perfect for any time of day.
Here are some delicious ideas for how to serve them:
- Pack them in lunchboxes as a fun, colorful snack that feels like a treat
- Pair them with a glass of cold milk for a nostalgic cookie-and-milk combo
- Serve them with Greek yogurt and fresh berries for a quick, protein-rich breakfast parfait
- Use them as a post-workout snack for quick carbs, protein, and healthy fats
- Include them in snack boards or charcuterie-style platters for a party
- Bring them on road trips or hikes as an easy-to-carry energy boost
- Keep them on hand for late-night cravings without reaching for processed snacks
- Crumble one into oatmeal or smoothie bowls for added texture and sweetness
These ideas show just how adaptable this no-bake snack can be. Whether you’re craving something sweet or just need a quick energy bite, these little treats fit the bill.
Common Mistakes to Avoid & How to Perfect the Recipe
Even a simple recipe like monster cookie energy balls can go wrong without the right technique. Avoid these common mistakes and follow the tips to ensure a perfect batch every time.
Mistake 1: Using the Wrong Oats
Problem: Quick oats or steel-cut oats can throw off the texture.
Solution: Use old-fashioned rolled oats for the ideal chew and structure.
Mistake 2: Not Chilling the Mixture
Problem: Trying to roll the mixture while it’s too soft results in sticky, uneven balls.
Solution: Chill the mixture for at least 30 minutes. This firms up the ingredients for easier rolling.
Mistake 3: Choosing the Wrong Nut Butter
Problem: Natural peanut butter with separated oil may cause the mixture to fall apart.
Solution: Use a well-stirred, creamy peanut butter or one specifically labeled as no-stir.
Mistake 4: Skipping the Binder
Problem: The mixture crumbles during shaping or storage.
Solution: Honey or maple syrup binds the ingredients. Do not reduce these unless you’re adjusting with other wet ingredients.
Mistake 5: Overloading with Mix-Ins
Problem: Too many M&Ms or chocolate chips can prevent the mixture from sticking together.
Solution: Stick to recommended amounts. You can always press extra candies on top after rolling.
Mistake 6: Rolling Balls Too Large
Problem: Oversized balls are harder to eat, store, and portion.
Solution: Stick with a tablespoon-size scoop for even, manageable bites.
Mistake 7: Improper Storage
Problem: Balls go stale or the candy melts.
Solution: Store in an airtight container in the fridge. Use parchment between layers if stacking.
By following these tips and avoiding the most common pitfalls, you’ll consistently get chewy, flavorful monster cookie energy balls every time.
Side Dish Recommendations
Though monster cookie energy balls are a standalone snack, they pair beautifully with a variety of healthy and complementary sides. Here are eight ideas to round out a snack session or even build a full mini-meal.
Fresh Fruit Skewers
Pairing with vibrant fruits like strawberries, grapes, or melon adds freshness and hydration. The contrast of juicy and chewy textures works beautifully.
Greek Yogurt with Honey
Serve alongside a small bowl of Greek yogurt drizzled with honey. This adds extra protein and balances the sweetness of the energy balls.
Veggie Sticks and Hummus
Create a sweet and savory snack plate by combining energy balls with sliced cucumbers, carrots, and hummus.
Cottage Cheese and Berries
Top a bowl of cottage cheese with fresh berries and a crumbled energy ball for a balanced snack loaded with protein and fiber.
Banana Spinach Smoothie
A green smoothie made with banana, spinach, and almond milk offers a refreshing, vitamin-packed side to sip with your snack.
Homemade Trail Mix
Mix a handful of dried fruits, nuts, and seeds with your energy balls for an on-the-go energy blend.
Mini Cheese and Whole-Grain Crackers
Add savory protein and crunch with a side of sharp cheese and whole-grain crackers. This balances the sweetness and rounds out the macros.
Herbal Tea or Infused Water
Enjoy a calming cup of herbal tea or sip fruit-infused water. These help cleanse the palate and hydrate, especially after sweet snacks.
Recipe Tips, Storage, and Reheating Instructions
Your monster cookie energy balls stay delicious and fresh when you use the right methods. The following tips help you keep their perfect chewy texture and bright color.
General Recipe Tips
- Use old-fashioned oats for the best chewy texture in your monster cookie energy balls.
- Slightly warm peanut butter for smoother mixing.
- Add more oats if the mixture turns sticky.
- Add more honey or peanut butter if the mixture turns dry.
- Fold in M&Ms last to prevent cracking.
- Stir gently to keep the candies intact.
- Chill the mixture to help your monster cookie energy balls hold their shape.
- Use silicone mats or parchment to prevent sticking.
- Mix with a silicone spatula to scrape the bowl clean.
Storage Instructions
Storing monster cookie energy balls is simple and keeps them fresh for days.
- Refrigerator:
Store in an airtight container. Keep them chilled for up to seven days. This helps maintain their chewy texture. - Freezer:
Freeze your monster cookie energy balls for up to three months. Use a freezer-safe container to prevent freezer burn. - Lunchbox Storage:
Pack them with a cold pack to keep the chocolate from melting. They stay firm and taste incredible.
Reheating or Thawing
Monster cookie energy balls never need true reheating. However, frozen balls may need a quick thaw.
- Thaw frozen balls for five minutes at room temperature.
- Warm them gently in your hands to soften.
- Avoid microwaving because the M&Ms may melt.
FAQs About Monster Cookie Energy Balls
Below are the most common questions people ask in the “People Also Ask” section. These answers help your readers understand the recipe fully.
Are monster cookie energy balls healthy?
Yes. Monster cookie energy balls provide whole grains, protein, and healthy fats. They satisfy cravings while keeping ingredients simple.
Can I make these nut-free?
Yes. Replace peanut butter with sunflower seed butter. This creates nut-free monster cookie energy balls perfect for school lunches.
Do monster cookie energy balls freeze well?
Absolutely. They freeze beautifully. Store them in a sealed container for up to three months.
Why are my energy balls too sticky?
Add more oats. Sticky dough often needs extra dry ingredients to balance the nut butter and honey.
Why are my energy balls falling apart?
Use more honey or peanut butter. These ingredients help hold your monster cookie energy balls together.
Are monster cookie energy balls gluten-free?
They are when you use certified gluten-free oats. Always check your label.
Can I add protein powder to the mixture?
Yes. Add one scoop of your favorite protein powder. Then add extra honey to help the mixture bind.
Are monster cookie energy balls good for weight loss?
They help satisfy cravings, which may prevent overeating. Eat them in moderation because the mix contains calorie-dense ingredients.
How long do monster cookie energy balls last?
They last one week in the fridge and up to three months in the freezer.
Can I add different mix-ins?
Yes. Try chopped nuts, dried fruit, shredded coconut, or mini white chocolate chips.
Do kids like monster cookie energy balls?
Kids love the colorful M&Ms and sweet flavor. They make great lunchbox treats.
Can I use maple syrup instead of honey?
Yes. Maple syrup creates vegan-friendly monster cookie energy balls with a softer texture.