Garlic Parmesan Cheeseburger Bombs
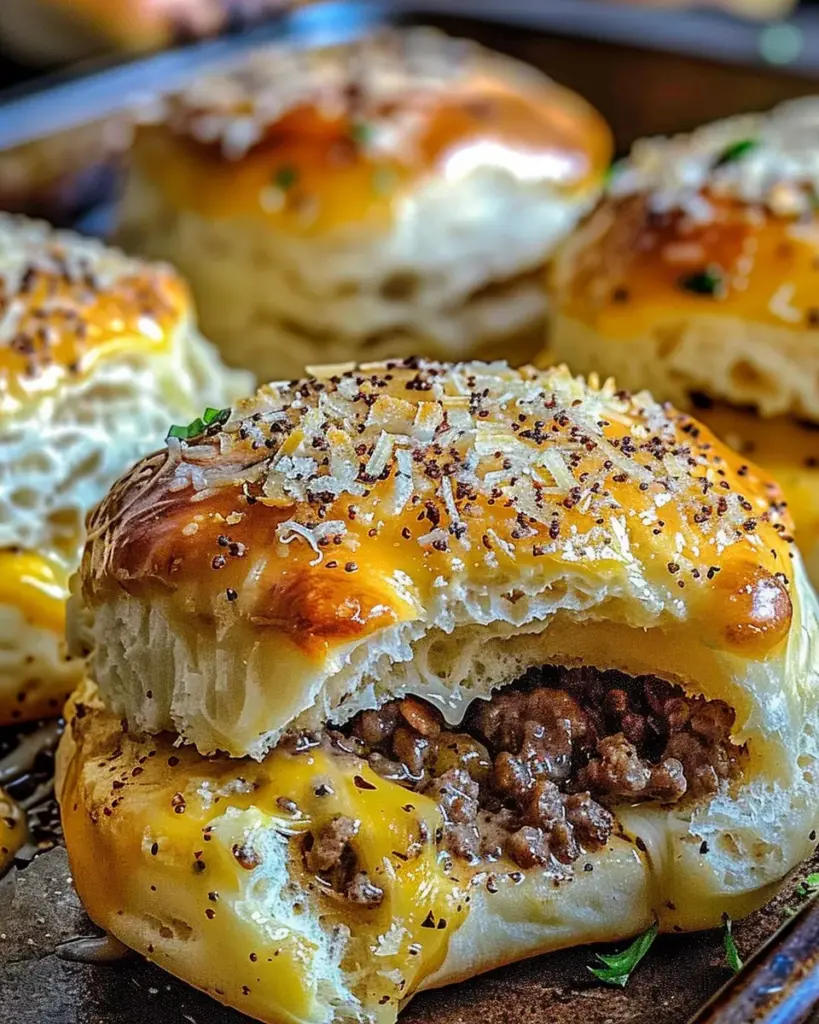
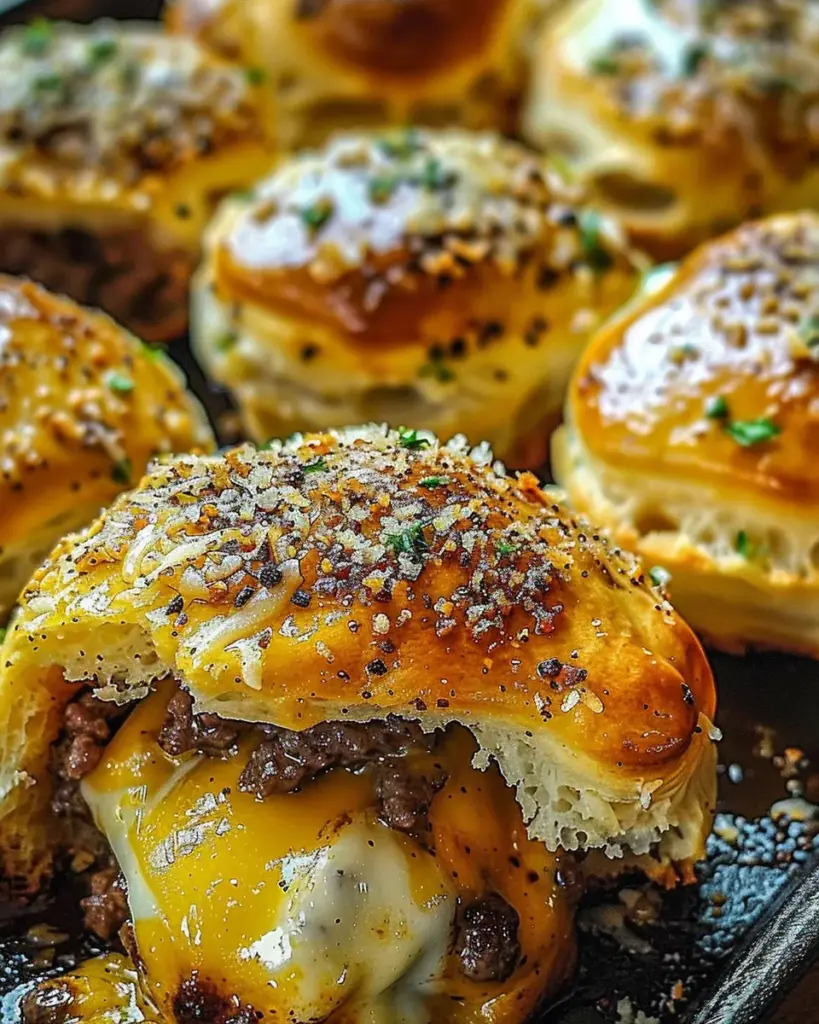
Garlic Parmesan Cheeseburger Bombs are the ultimate crowd-pleasing snack. Each bite bursts with juicy ground beef, melty cheddar cheese, and a savory garlic-Parmesan topping—all wrapped in a fluffy biscuit dough shell. These mini cheeseburgers aren’t just delicious—they’re fun to make and even better to eat.
Whether you’re hosting a party, preparing a kid-friendly meal, or looking for a unique appetizer, these cheeseburger bombs deliver bold flavors with minimal prep. The buttery garlic finish and gooey cheese center elevate them beyond your average burger snack.
Why readers will love this recipe:
- Quick prep using refrigerated biscuit dough
- Perfect for game day, potlucks, or snack nights
- Highly customizable with different cheeses or fillings
- Make-ahead and freezer-friendly for easy planning
Garlic Parmesan Cheeseburger Bombs are the kind of recipe you’ll want to make again and again—because everyone asks for more.
Preparation Phase & Tools to Use
Essential Tools and Equipment
To make cheeseburger bombs successfully, gather these essential kitchen tools:
- Large Skillet – for browning and seasoning ground beef evenly
- Spatula – to break up meat into fine crumbles
- Rolling Pin – helps flatten the biscuit dough evenly (or use your hands)
- Baking Sheet – for baking the bombs to golden perfection
- Brush – ideal for applying the melted garlic-Parmesan butter topping
- Mixing Bowls – for combining topping ingredients and assembling
- Measuring Spoons & Cups – to ensure ingredient accuracy
- Oven – preheat to 375°F (190°C) for even baking
Importance of Each Tool
- A non-stick or well-seasoned skillet helps prevent sticking and promotes even browning.
- A rolling pin or hand-flattening ensures uniform dough thickness.
- The baking sheet provides surface area and allows for airflow between bombs, promoting crisp edges.
- A brush helps you evenly distribute the garlic-Parmesan topping while the bombs are hot.
Tip: Use parchment paper on your baking sheet for easier cleanup and to prevent sticking.
Preparation Tips
- Bring your ground beef to room temperature before cooking. This promotes more even browning.
- Preheat the oven to 375°F before assembling the bombs. A hot oven ensures proper rising and golden browning.
- Drain excess grease from the beef to avoid soggy dough bottoms.
- Let the cooked beef mixture cool slightly before placing it on dough. Hot filling may soften the dough too much and make sealing difficult.
- Flatten dough to a uniform 4-inch circle for consistent size and even baking.
- Seal the edges firmly to prevent filling from leaking during baking.
- Place bombs seam-side down to hold their shape and keep filling secure.
Ingredients
Filling
- Ground Beef – 1 lb (80/20 fat content recommended for juiciness)
- Cheddar Cheese – 1 cup, shredded
- Garlic Powder – 2 teaspoons
- Salt – 1 teaspoon
- Black Pepper – 1 teaspoon
Dough
- Refrigerated Biscuit Dough – 2 cans (8 biscuits each)
Topping
- Butter – 2 tablespoons, melted
- Parmesan Cheese – ½ cup, grated
- Garlic Powder – 1 teaspoon
Ingredient Note: Swap in mozzarella or pepper jack for flavor variations. Freshly grated Parmesan delivers better texture than pre-shredded versions.
Step-by-Step Directions
Step 1: Prepare Ingredients
- Gather all ingredients and kitchen tools.
- Preheat oven to 375°F (190°C).
- Let ground beef sit at room temperature for about 15 minutes.
- Open the biscuit dough cans and separate the biscuits.
Step 2: Cook the Ground Beef
- Heat a large skillet over medium heat.
- Add ground beef and season with salt and pepper.
- Cook for 5–7 minutes, breaking up the meat with a spatula.
- When no pink remains and the internal temperature reaches 160°F (71°C), drain excess grease.
- Stir in garlic powder and half of the shredded cheddar.
- Mix until cheese melts into the beef. Set aside to cool slightly.
Pro Tip: If using leaner beef, add a splash of oil for richness.
Step 3: Assemble the Cheeseburger Bombs
- Flatten each biscuit round into a 4-inch circle using a rolling pin or hands.
- Spoon about 1 tablespoon of the beef mixture into the center of the dough.
- Add 1 tablespoon of shredded cheddar cheese on top.
- Fold or place another flattened biscuit over the filling (depending on your method), then pinch edges tightly to seal.
- Repeat with all biscuits, forming around 16 bombs.
Variation: Add sautéed onions, cooked bacon, or diced jalapeños for extra flavor.
Step 4: Bake the Bombs
- Arrange sealed bombs seam-side down on an ungreased baking sheet.
- Leave at least 2 inches between each bomb.
- Bake for 15–20 minutes, or until tops are golden brown and fully baked.
Tip: Rotate the baking sheet halfway through if your oven has hot spots.
Step 5: Add the Parmesan Garlic Topping
- While bombs are baking, melt butter in a small bowl.
- Stir in grated Parmesan and garlic powder.
- As soon as bombs come out of the oven, brush them generously with the garlic-Parmesan butter mixture.
- Let cool for 2–3 minutes before serving.
Serving Suggestions
Serving Garlic Parmesan Cheeseburger Bombs is just as fun as making them. These versatile bites work in casual or party settings and are excellent for dipping and pairing.
How to Serve
- Serve warm: Let the bombs rest for 2–3 minutes after baking, then serve while the cheese is still gooey inside.
- Platter presentation: Arrange on a large serving tray. Garnish with chopped parsley or an extra sprinkle of Parmesan for visual appeal.
- Make it interactive: Offer dipping sauces like ranch, ketchup, or sriracha mayo on the side.
Occasions to Serve
- Game day snack spread
- Kids’ lunch or after-school treat
- Casual weeknight dinner
- Potluck or holiday appetizer
- Picnic or outdoor party bites
Beverage Pairings
- Iced tea or lemonade for a family-friendly meal
- Light beer or pale ale for adult gatherings
- Cola or root beer for a diner-style touch
Common Mistakes to Avoid & How to Perfect the Recipe
Perfecting cheeseburger bombs means avoiding a few common pitfalls. Here’s how to troubleshoot and elevate the final product.
Mistake 1: Overfilling the Dough
- Issue: Filling leaks or bursts during baking.
- Solution: Use no more than 1 tablespoon each of beef and cheese per bomb. Seal the dough securely and avoid thin spots.
Mistake 2: Not Sealing the Edges Properly
- Issue: Seams split and fillings ooze out.
- Solution: Pinch edges firmly. Place bombs seam-side down on the baking sheet to help maintain shape during baking.
Mistake 3: Dough Is Unevenly Flattened
- Issue: Uneven cooking and texture.
- Solution: Flatten biscuit dough to a uniform 4-inch circle for consistent size and baking time.
Mistake 4: Filling Too Hot When Assembling
- Issue: Hot filling softens the dough and makes sealing difficult.
- Solution: Allow the cooked beef and cheese mixture to cool slightly before assembly.
Mistake 5: Not Draining Ground Beef
- Issue: Excess moisture causes soggy bottoms.
- Solution: Drain the cooked beef mixture before mixing in garlic powder and cheese.
Mistake 6: Skipping the Topping or Applying Too Late
- Issue: Less flavor impact.
- Solution: Brush garlic-Parmesan butter immediately after baking so it soaks into the warm crust.
Mistake 7: Undercooking or Overcooking
- Issue: Pale, doughy bombs or dried-out filling.
- Solution: Bake until golden brown—generally 15–20 minutes at 375°F. Keep an eye on them after 15 minutes.
Mistake 8: Using the Wrong Dough
- Issue: Dough doesn’t puff or becomes tough.
- Solution: Use quality refrigerated biscuit dough that’s fresh and not close to expiration.
For a crispier finish, lightly brush the bombs with an egg wash before baking.
Side Dish Recommendations
Pairing Garlic Parmesan Cheeseburger Bombs with the right side dish turns them from a snack into a complete meal. Here are eight satisfying options:
1. Classic French Fries
Crispy fries are a natural match for cheeseburger bombs. Bake them in the oven or air fryer. Season with garlic powder and sea salt to echo the bombs’ flavor.
2. Coleslaw with Tangy Dressing
The creamy crunch of coleslaw offers contrast to the rich bombs. Use a tangy vinegar-based dressing to cut through the savory filling. Add shredded carrots and cabbage for color.
3. Sweet Potato Wedges
Roasted sweet potato wedges add a bit of sweetness to balance the garlic and cheese. Toss with olive oil, smoked paprika, and garlic salt for bold flavor.
4. Garden Salad with Lemon-Garlic Vinaigrette
A fresh green salad brings brightness to the plate. Mix romaine, cucumbers, cherry tomatoes, and red onions. Dress with a homemade lemon-garlic vinaigrette.
5. Baked Beans or BBQ Beans
Warm, slightly sweet baked beans offer a comfort-food pairing. Choose a smoky barbecue version or make a quick homemade recipe with canned beans and spices.
6. Pickle Spears or Quick Pickled Vegetables
Crunchy, tangy pickles balance the richness of cheeseburger bombs. Try dill spears or a mix of quick-pickled cucumbers, red onions, and carrots for a bright bite.
7. Corn on the Cob with Herb Butter
A summertime favorite that pairs well with cheeseburgers. Brush cooked corn with garlic-herb butter to tie in the Parmesan topping flavors.
8. Onion Rings (Baked or Air-Fried)
Crispy onion rings add crunch and a savory-sweet flavor. Breaded and baked or air-fried versions offer lighter alternatives to traditional deep-fried rings.
Recipe Tips
Perfect your Garlic Parmesan Cheeseburger Bombs with these expert suggestions:
- Use freshly grated Parmesan cheese for stronger flavor and better melting than pre-packaged versions.
- Select 80/20 ground beef for optimal flavor and juiciness. Leaner meat can result in dry filling.
- Let the beef mixture cool before placing it on the dough. This helps avoid steam softening the biscuit and causing leaks.
- Try different cheese blends like pepper jack for heat, mozzarella for stretch, or a mix of cheddar and gouda for depth.
- Avoid overfilling the dough. Stick to about 1 tablespoon of filling per bomb to prevent bursting during baking.
- Seal edges well and place bombs seam-side down to maintain shape during baking.
- Pre-assemble and refrigerate up to 24 hours in advance for quick weeknight baking.
- Egg wash the dough (1 egg beaten with 1 tablespoon of water) before baking for an extra golden, crisp finish.
Storage Instructions
Proper storage keeps your cheeseburger bombs fresh and flavorful:
- Refrigerate Leftovers: Cool bombs completely and store in an airtight container in the fridge for up to 4 days.
- Freezing (Pre- or Post-Bake):
- Before baking: Assemble bombs and place on a baking tray. Freeze until solid, then transfer to a freezer bag.
- After baking: Let cool completely before freezing. Wrap each bomb in foil or place them in a freezer-safe container.
- Freezer Life: Bombs keep well for up to 2 months.
Reheating Instructions
Keep texture and flavor intact by using the right reheating method:
- Oven Reheating:
Preheat oven to 350°F (175°C). Place bombs on a baking sheet. Bake for 8–10 minutes if refrigerated, or 12–15 minutes if frozen. - Air Fryer Reheating:
Set air fryer to 350°F. Heat refrigerated bombs for 5–6 minutes or frozen ones for 8–10 minutes until hot and crispy. - Avoid microwaving when possible. It tends to soften the crust and reduce crispiness. If using microwave, wrap in a paper towel and heat in 20-second intervals.
Frequently Asked Questions (FAQs)
Can I make cheeseburger bombs ahead of time?
Yes. You can assemble the bombs and store them covered in the refrigerator for up to 24 hours before baking. For longer storage, freeze them unbaked and bake from frozen when needed.
Can I freeze cheeseburger bombs?
Absolutely. You can freeze either unbaked or baked cheeseburger bombs. Just ensure they’re wrapped tightly to avoid freezer burn. Bake straight from frozen, adding a few extra minutes to the cook time.
What kind of cheese works best?
Cheddar offers great flavor and meltability, but mozzarella, pepper jack, and American cheese are also excellent. Use freshly shredded cheese for the smoothest melt.
Can I make a vegetarian version?
Yes. Replace the ground beef with plant-based crumbles or cooked, seasoned mushrooms and onions. Follow the same preparation steps.
How do I keep them from leaking or bursting?
Avoid overfilling, seal the dough edges tightly, and place bombs seam-side down. Allow filling to cool slightly before assembling to reduce internal pressure during baking.
Are these good for meal prep?
Yes. Make a large batch, freeze, and reheat as needed for a quick lunch or snack. They’re ideal for batch cooking and portion control.
Can I use a different type of dough?
Yes. Refrigerated crescent roll dough or pizza dough can work, though results may vary in texture. Biscuit dough offers the fluffiest bite.
What’s the best dipping sauce?
Try ranch dressing, spicy ketchup, sriracha mayo, garlic aioli, or even BBQ sauce. The rich, savory bombs pair well with tangy or creamy dips.