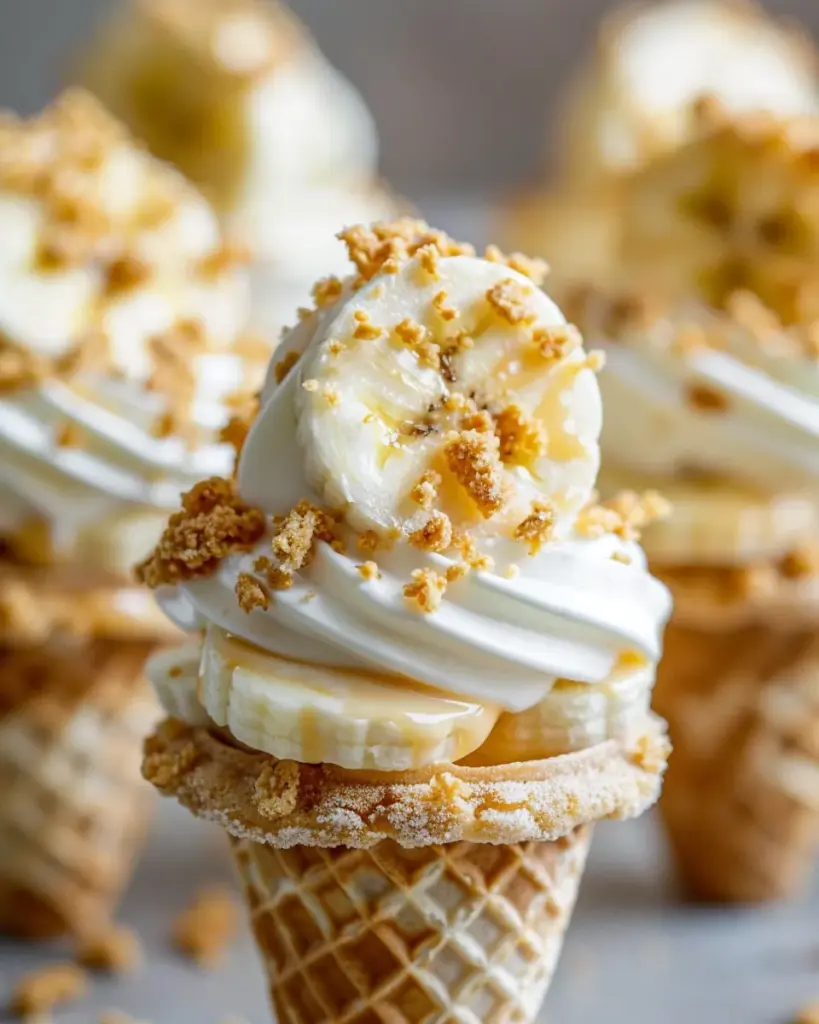
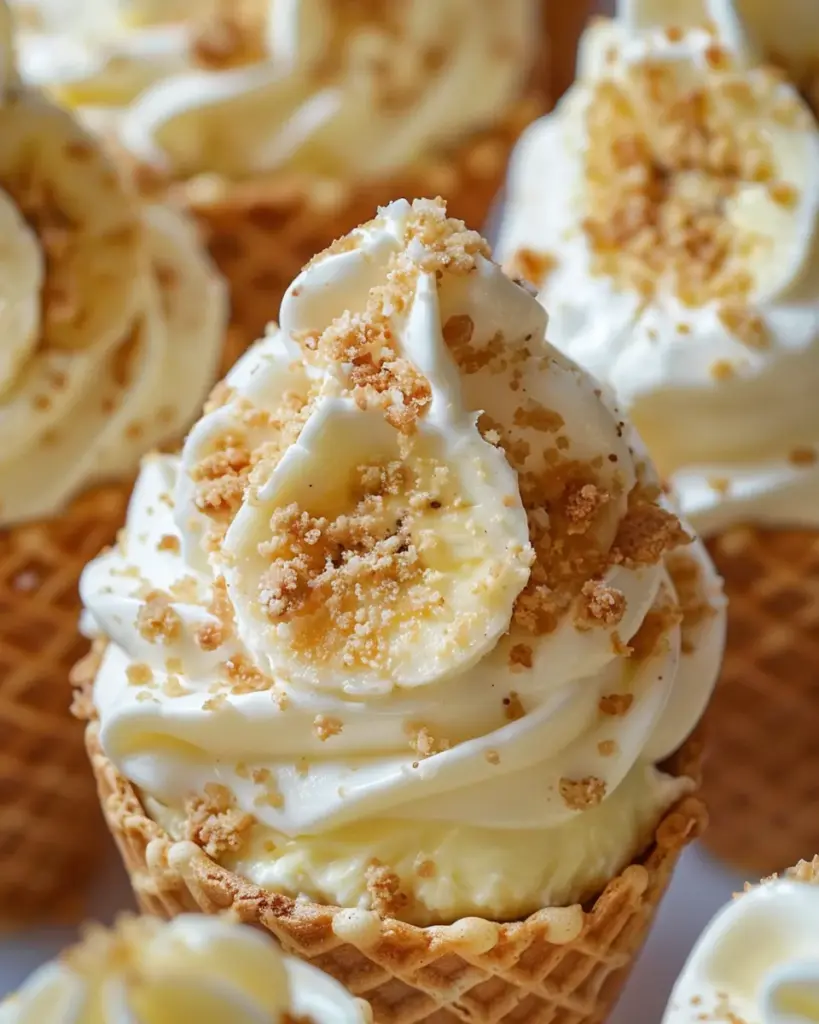
Banana Pudding Cheesecake Cones
Satisfy your sweet tooth with Banana Pudding Cheesecake Cones — a playful twist on two classic desserts. These cones combine the creamy richness of cheesecake with the tropical sweetness of banana pudding. The result is a dessert that feels indulgent yet fun — perfect for summer gatherings, casual get-togethers, or cozy family nights. Readers will love how quickly you can assemble these treats, and how impressive they look without much effort.
This dessert shines because it:
- blends creamy cheesecake texture with fresh banana flavor for a unique taste profile
- uses simple, everyday ingredients — no fancy baking required
- delivers a ready‑to‑serve dessert in a portable, cone-shaped package
- offers room for customization with toppings, variations, or personal flair
Dive into the preparation phase below — get your tools and ingredients ready.
Preparation Phase & Tools to Use
Essential Tools and Equipment
- Large mixing bowl
- Electric mixer (or hand mixer)
- Spatula or mixing spoon
- Measuring cups
- Fork or potato masher (for bananas)
- Ice cream cones (regular or mini)
- Refrigerator space (tray or dish to hold cones upright)
Why each tool matters
- Large mixing bowl: Provides enough space to combine ingredients without spilling.
- Electric mixer: Ensures cream cheese and condensed milk combine smoothly, preventing lumps and creating a creamy texture.
- Spatula / mixing spoon: Useful for folding banana and whipped topping in gently so the mix stays light and airy.
- Measuring cups: Guarantee accurate proportions — a big factor for balanced flavor and correct texture.
- Fork or masher: Helps mash bananas to a consistent texture for even distribution in the cheesecake filling.
- Cones & refrigerator space: Cones give the dessert its portable, fun shape. Chilling ensures the filling firms up and the cones stay intact.
Preparation Tips
- Use softened cream cheese — it mixes more smoothly and yields a silkier texture.
- Mash bananas thoroughly. Small lumps give occasional banana bursts, while over‑chunky pieces can disrupt the smoothness.
- If you’re using real whipped cream instead of store‑bought topping, chill the bowl and beaters beforehand for better volume/stability.
- Work gently when folding ingredients to preserve airiness in the filling.
Ingredients (for 6 Cones)
| Ingredient | Amount |
|---|---|
| Graham cracker crumbs | 1 cup |
| Cream cheese, softened | 8 oz |
| Sweetened condensed milk | 1 cup |
| Ripe bananas, mashed | 2 bananas |
| Whipped topping | 1 cup |
| Ice cream cones (regular or mini) | 6 cones |
| Vanilla extract | 1 teaspoon |
| Pinch of ground cinnamon (optional) | — |
Step‑by‑Step Directions
- Prepare the base mixture
In a large mixing bowl, combine the softened cream cheese and sweetened condensed milk. Use an electric mixer to beat until smooth and creamy. - Add banana flavor
Mash the ripe bananas thoroughly. Fold the mashed bananas into the cream cheese mixture until fully incorporated. - Incorporate whipped topping
Gently fold in the whipped topping until the mixture becomes light and fluffy. If desired, stir in vanilla extract and a pinch of cinnamon for extra warmth. - Fill the cones
Spoon the mixture generously into each ice cream cone. Fill them high so the dessert looks abundant and appealing. - Optional topping
Add a dollop of extra whipped topping on each cone. For crunch and flavor, sprinkle graham cracker crumbs or add a thin banana slice on top. - Chill before serving
Place the filled cones upright in the fridge for about 30 minutes. Chilling helps the filling firm up and ensures the cones stay crisp. - Serve and enjoy
Remove from refrigerator and serve chilled. These cones taste best when slightly cold — the texture stays creamy and refreshing.
Variation Ideas
- Chocolate twist: Stir in 2 tablespoons of cocoa powder or finely chopped chocolate into the filling for a chocolate‑banana cheesecake flavor.
- Nutty crunch: Top with chopped nuts (pecans, walnuts, or almonds) for added texture and nutty richness.
- Mini‑cone party: Use mini ice cream cones for bite‑sized desserts — ideal for parties or buffet tables.
- Extra banana boost: Fold in small banana chunks for a more textured banana‑cheesecake experience.
Serving Suggestions
- Serve the Delightful Banana Pudding Cheesecake Cones chilled for the best texture and flavour.
- Present the cones upright in a stylish stand or tall glass so the filling stays intact and the graham‑cracker “crust” shows.
- Garnish each cone with banana slices, extra graham‑cracker crumbs, a drizzle of caramel sauce, or a sprinkle of cinnamon for visual appeal.
- For a fun twist, serve mini portions in smaller cones or even edible wafer cups.
- These cones work well as a dessert for picnics, outdoor barbecues, kids’ parties, or casual family dinners — portable, no forks needed, minimal mess.
- You can also offer toppings on the side (e.g., crushed nuts, chocolate shavings, fresh berries) and let guests customise their cones.
Common Mistakes To Avoid & How to Perfect the Recipe
- Mistake: Using cream cheese that is too cold.
Fix: Allow the cream cheese to soften to room temperature. This ensures a smooth, lump‑free base. - Mistake: Over‑mixing when folding in the whipped topping.
Fix: Use gentle folding strokes to keep the mixture light and airy. Heavy mixing may deflate the topping and yield a dense texture. - Mistake: Filling the cones too early and letting them sit for long periods.
Fix: Fill just before serving if possible. The longer the cones sit, the more the cone may soften and lose crispness. - Mistake: Using under‑ripe bananas with little flavour.
Fix: Choose bananas that are ripe (some brown speckles on the skin) for maximum sweetness and banana flavour. - Mistake: Skipping the chill time.
Fix: Let the filled cones chill in the fridge for about 30 minutes so the filling sets slightly and flavours meld. - Mistake: Ignoring garnish or presentation.
Fix: A simple topping of whipped cream and a slice of banana or some crumbs elevates the dessert visually and flavour‑wise.
Side Dish Recommendations
Here are 8 side dish ideas (H3) that pair perfectly with these cheesecake cones:
1. Fresh Berry Cup
Serve a small cup of mixed fresh berries (strawberries, blueberries, raspberries) to contrast the creamy dessert with tart‑sweet freshness.
2. Salted Caramel Apples Slices
Thinly sliced apple wedges drizzled with salted caramel add a crisp, tangy‑sweet bite alongside the creamy bananas and cheesecake.
3. Mini Chocolate Brownies
Tiny chocolate brownies provide a rich, fudgy companion dessert. Their deep chocolate flavour balances the lightness of the cones.
4. Coconut Macaroons
Crispy‑on‑the‑outside, chewy inside coconut macaroons bring a tropical note that complements the banana flavour nicely.
5. Lemon Sorbet
A small scoop of lemon sorbet adds refreshing acidity and temperature contrast, cleansing the palate between bites of the cheesecake cone.
6. Honey‑Roasted Nuts
Offer a dish of honey‑roasted almonds or pecans for guests to sprinkle over their cones. The crunchy texture and sweet‑nutty flavour work beautifully.
7. Vanilla Wafers & Banana Slices
Provide a bowl of extra vanilla wafer cookies and banana slices to echo the banana‑pudding theme and allow guests to build their own extra layer of flavour.
8. Cold Brew Coffee or Iced Tea
Pairing with a chilled beverage — like cold brew coffee or a lightly sweetened iced tea — helps balance the sweetness and richness of the dessert while keeping the overall presentation casual and refreshing.
Recipe Tips
- Use very ripe bananas to boost natural sweetness and flavor.
- Ensure the cream cheese is completely softened before mixing to avoid lumps and achieve a smooth texture.
- Fold in whipped topping gently using a spatula to keep the mixture light and airy—over‑mixing can deflate the texture.
- To keep the cones crisp, assemble them just before serving. Some sources suggest layering crushed wafers at the bottom of the cone to act as a moisture‑barrier.
- For added flair, you can drizzle caramel sauce or sweetened condensed milk on top of the finished cones.
- Customize your cones: Use waffle cones or sugar cones depending on your preference; you may even use gluten‑free versions.

Storage and Reheating Instructions
- Storing Filled Cones: Once the cones are filled, store them in the refrigerator. They’re best enjoyed within a few hours to retain crunch. After extended storage, the cone may soften.
- Storing Components Separately: If you need to prepare ahead, store the cheesecake filling in an airtight container in the fridge for up to 2‑3 days. Store cones in a dry, cool place. Then assemble just before serving.
- Freezing: Freezing is generally not recommended because the cone texture degrades and the creamy filling may change consistency.
- Reheating: This is a chilled dessert—no reheating needed. If you like a slightly softer texture, allow the filled cones to sit at room temperature for 5‑10 minutes before serving. But note that this may make the cone less crisp.
FAQs
Q: Can I substitute the waffle cones with cups or glasses?
A: Yes. If you prefer, you can serve the filling in small dessert cups instead of cones. This also helps if you want to assemble early and avoid soggy cones.
Q: How far in advance can I make these?
A: You may prepare the fillings ahead (1‑2 days), but fill the cones only about 1‑4 hours before serving for best texture. Longer lead times tend to soften the cones.
Q: Can I use homemade banana pudding instead of instant mix?
A: Yes, you can. Just make sure your homemade pudding is fully chilled and set before layering into the cones. Instant mix is convenient and sets quickly.
Q: What about dietary substitutions (gluten free, dairy free)?
A: For gluten‑free: use gluten‑free cones and wafers. For dairy‑free: you would need dairy‑free cream cheese and whipped topping substitutes—but note the texture may differ. Some blogs mention customizing for dietary needs.
Q: How do I keep bananas from browning on top?
A: Use fresh banana slices just before serving. You can toss bananas in a bit of lemon juice to slow browning if preparing slightly ahead.